SoundSwitch Download, Features, Setup, and Alternatives
If you’ve ever unplugged your headphones mid-call, only to have your voice keep blasting out of your desktop speakers, you already know the problem SoundSwitch was built to solve. Windows still doesn’t offer a fast, one-click way to jump between your speakers, headset, and microphone — you’re stuck digging through Settings every single time.
SoundSwitch fixes that with a single keystroke. It’s a free, open-source Windows utility that lets you flip between audio playback and recording devices instantly, without touching a mouse. In this guide, you’ll find everything you need: what SoundSwitch actually does, how to download and install it safely, how to set up hotkeys that actually stick, common problems and fixes, and a few solid alternatives if it’s not quite the right fit for you.
What Is SoundSwitch?
SoundSwitch is a lightweight, open-source audio device switcher for Windows. It sits quietly in your system tray and lets you cycle through your chosen playback and recording devices using a customizable keyboard shortcut.
At its core, SoundSwitch is a device switcher, not a full audio mixer. It doesn’t change your volume levels or add equalizer effects. Instead, it focuses on one job and does it well: letting you swap your default audio output or input device in under a second.
The app was originally created by developer Antoine Aflalo and is now maintained as an open-source project (licensed under GPL 3.0) on GitHub, with contributions from the community. Because the source code is public, anyone can inspect exactly what it does — which matters if you’re cautious about installing small utilities that run in the background.
How SoundSwitch Helps Switch Audio Devices
Here’s the everyday scenario: you’re gaming with a headset, then want to switch to desktop speakers for music, then back to the headset mic for a Discord call. Normally that means several clicks through Windows sound settings.
With SoundSwitch, you:
- Pick which devices you want in your rotation (playback and recording, separately)
- Assign a hotkey to each list
- Press the hotkey to cycle to the next device in that list
A small on-screen banner or notification confirms which device is now active, so you’re never left guessing whether the switch actually worked.
SoundSwitch vs Windows Sound Settings
Windows technically lets you change your default audio device, but the process is clunky:
| Task | Windows Settings | SoundSwitch |
|---|---|---|
| Change default playback device | Settings → System → Sound → select device (3–4 clicks) | One hotkey press |
| Switch mic input | Separate menu, more clicks | Same hotkey group, instant |
| Visual confirmation of the switch | None by default | Banner, toast, or sound notification |
| Limit to only the devices you use | Not possible | Yes, you choose which devices appear |
| Mute mic quickly | Not built-in | One-key toggle with visual indicator |
The difference isn’t dramatic for occasional use, but if you switch devices several times a day — streamers, gamers, remote workers doing back-to-back calls — those saved clicks add up fast.
SoundSwitch Features
SoundSwitch keeps its feature list focused, which is part of its appeal. It’s not trying to be an all-in-one audio suite; it’s trying to nail one workflow.
Quickly Switch Between Audio Devices
The headline feature is speed. Once configured, switching between two or more audio devices takes a single keypress. There’s no menu to navigate and no mouse required, which is especially useful mid-game or mid-call when reaching for a trackpad isn’t convenient.
Switch Speakers and Headphones With a Hotkey
This is the single most common use case people install SoundSwitch for. You set up your speakers and headphones as the two (or more) devices in your playback rotation, assign a hotkey like Ctrl+Alt+F11, and toggle between them instantly whenever you plug in or unplug your headset.
Audio Output and Default Device Switching
SoundSwitch works by changing the Windows default audio device in the background — the same setting Windows itself uses to decide where sound goes. That means any app playing audio through the system default (browsers, games, Spotify, Zoom) automatically follows the switch. You don’t need to reconfigure anything inside those apps.
Custom Audio Device Shortcuts
You’re not locked into the default key combination. SoundSwitch lets you assign whichever key combo feels natural, as long as it doesn’t conflict with something else on your system. Many users set separate shortcuts for:
- Playback device switching
- Recording device (microphone) switching
- Quick microphone mute
Windows Audio and Sound Management
Beyond basic switching, SoundSwitch includes a few management touches that make daily use smoother:
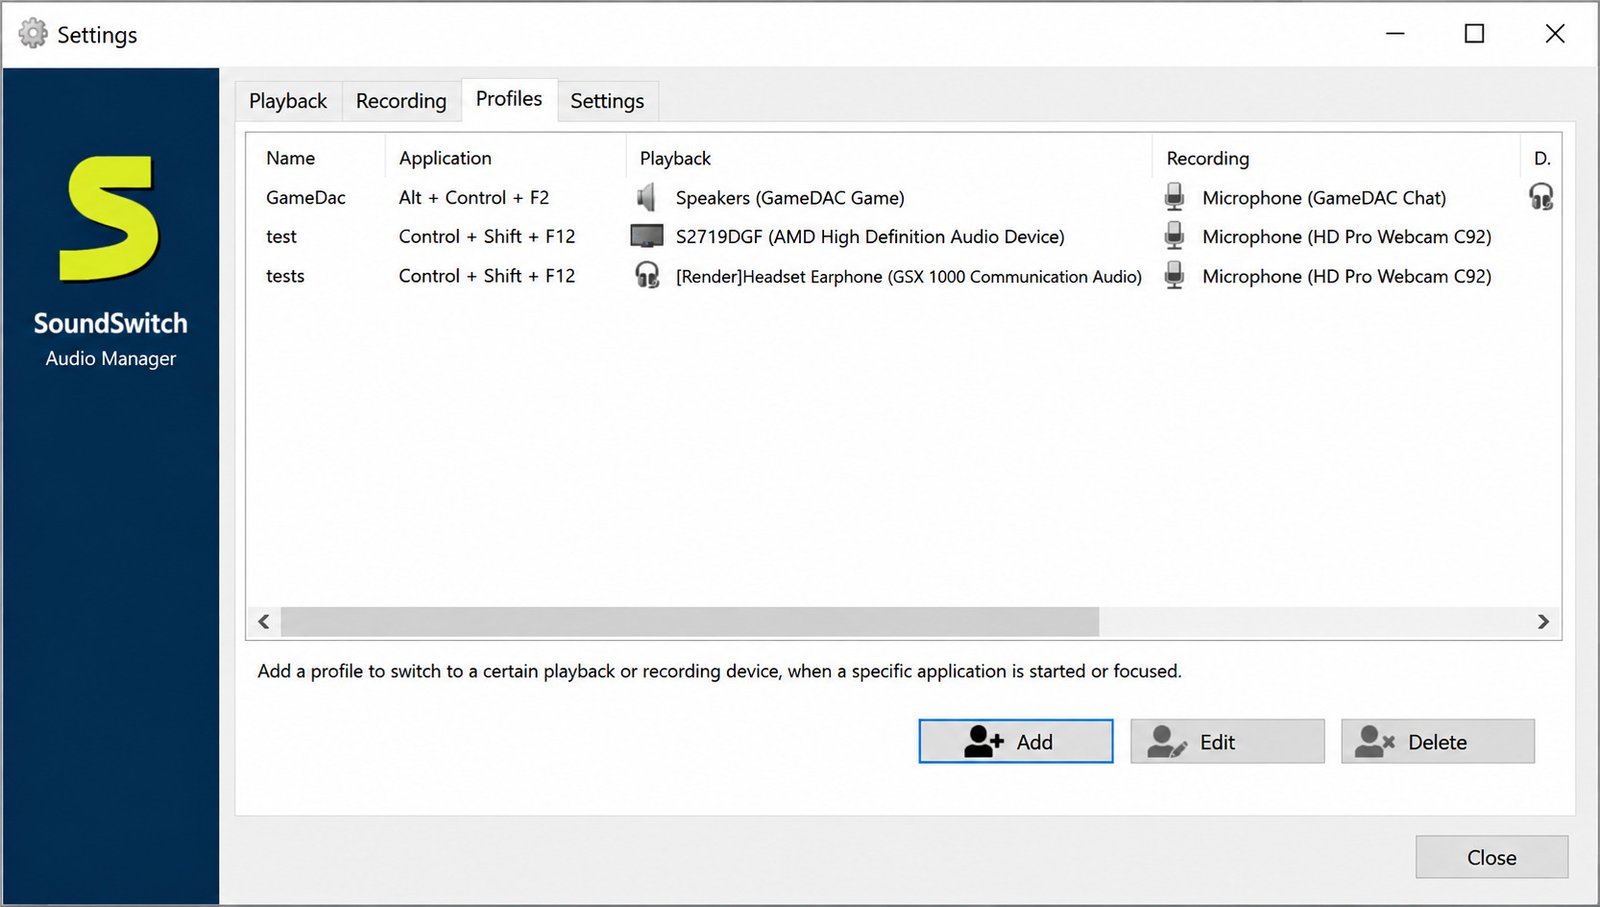
- Per-app rules: automatically switch to a specific device when a chosen application opens or gains focus
- Profiles: save a full audio configuration (playback device, recording device, and volume) and recall it in one click
- Notification styles: choose between a banner, a Windows toast notification, or a short confirmation sound
Strengths
- Instant, single-keypress device switching
- Free and fully open source
- Works with any device Windows already recognizes
- Per-app rules and saved profiles
Limitations
- No per-app volume mixing
- No equalizer or volume controls
- Installer only — no official portable build
SoundSwitch Hotkey and Audio Shortcuts
Hotkeys are configured from the Hotkeys tab in Settings. You can rebind:
- Playback device cycle
- Recording device cycle
- Microphone mute toggle
- Profile switching
If a hotkey doesn’t register, it’s almost always because another app (or Windows itself) already claims that combination — more on fixing that in the troubleshooting section below.
SoundSwitch for Windows 11 and Windows 10
SoundSwitch runs on both Windows 10 and Windows 11, along with older builds going back to Windows 7 and 8, according to the developer’s own compatibility notes. The interface and setup process are essentially identical across versions, so a guide written for Windows 10 will still apply almost line-for-line on Windows 11.
SoundSwitch Download
Before installing anything that touches your system audio settings, it’s worth knowing exactly where to get it from and which version fits your machine.
SoundSwitch Latest Version
SoundSwitch is actively maintained, with new releases published periodically through its official GitHub repository and companion download site. Version numbers climb steadily (for example, 7.x releases), each typically bringing bug fixes, small feature additions, and compatibility updates for newer Windows builds.
SoundSwitch Free Download
SoundSwitch has always been free to download and use, with no premium tier, license key, or paywall. Because it’s open source under the GPL 3.0 license, the source code is publicly available too, so technically inclined users can review or even modify it.
SoundSwitch Download for Windows
The safest route is the official SoundSwitch website or its GitHub releases page — both link to the same installer.
Avoid third-party “download” sites that bundle extra software or wrap installers in their own downloader tools — this is common with freeware and it’s an easy way to end up with browser toolbars you never wanted.
SoundSwitch Windows 11 Download
There’s no separate “Windows 11 edition.” The same installer detects your OS version and installs correctly on either Windows 10 or Windows 11.
SoundSwitch Windows 10 Download
Same story here — one installer, both editions supported. If you’re running an older build of Windows 10, it’s worth checking for pending Windows updates first, since very old builds can occasionally cause quirks with any third-party audio tool.
SoundSwitch Installer and Setup File
The installer is small — historically only a few megabytes — and installs in seconds. It’s a standard Windows .exe setup file: no command line steps, no manual configuration files to edit.
SoundSwitch Portable Version
Officially, SoundSwitch is distributed as an installer rather than a portable, no-install build. If portability matters to you (for example, running it from a USB stick on shared machines), check the GitHub releases page for the most current build options, since portable community builds occasionally surface but aren’t the primary supported format.
SoundSwitch System Compatibility
SoundSwitch for Windows 11
Fully supported. Users report no meaningful compatibility issues on current Windows 11 builds, including devices connected via Bluetooth, USB, and standard 3.5mm jacks.
SoundSwitch for Windows 10
Fully supported across all modern Windows 10 builds. This has been the primary platform for SoundSwitch since its early releases.
SoundSwitch Audio Device Compatibility
SoundSwitch doesn’t rely on device-specific drivers — it works with whatever audio devices Windows itself already recognizes. If a device shows up normally in Windows Sound Settings, it will show up in SoundSwitch’s device list too.
Supported Speakers, Headphones, and Audio Outputs
In practice, that covers:
- Built-in laptop speakers and microphones
- USB headsets and USB microphones
- Bluetooth headphones and earbuds
- HDMI or DisplayPort audio (monitor speakers, TVs)
- Digital outputs like optical (S/PDIF) connections
- External USB DACs and audio interfaces
How to Install SoundSwitch
Installation is straightforward, but a couple of small steps make the first setup smoother.
Download and Run the SoundSwitch Installer
Download the installer from the official site or GitHub releases page, then double-click the downloaded .exe file.
Windows SmartScreen may show a brief warning for unsigned or less-common apps — this is standard for many small open-source utilities, not necessarily a red flag, but you should always verify you downloaded from the official source first.
Complete the SoundSwitch Setup
The setup wizard is short: accept the license, choose an install location (the default works fine for almost everyone), and finish. SoundSwitch launches automatically after installation and adds an icon to your system tray.
Configure SoundSwitch After Installation
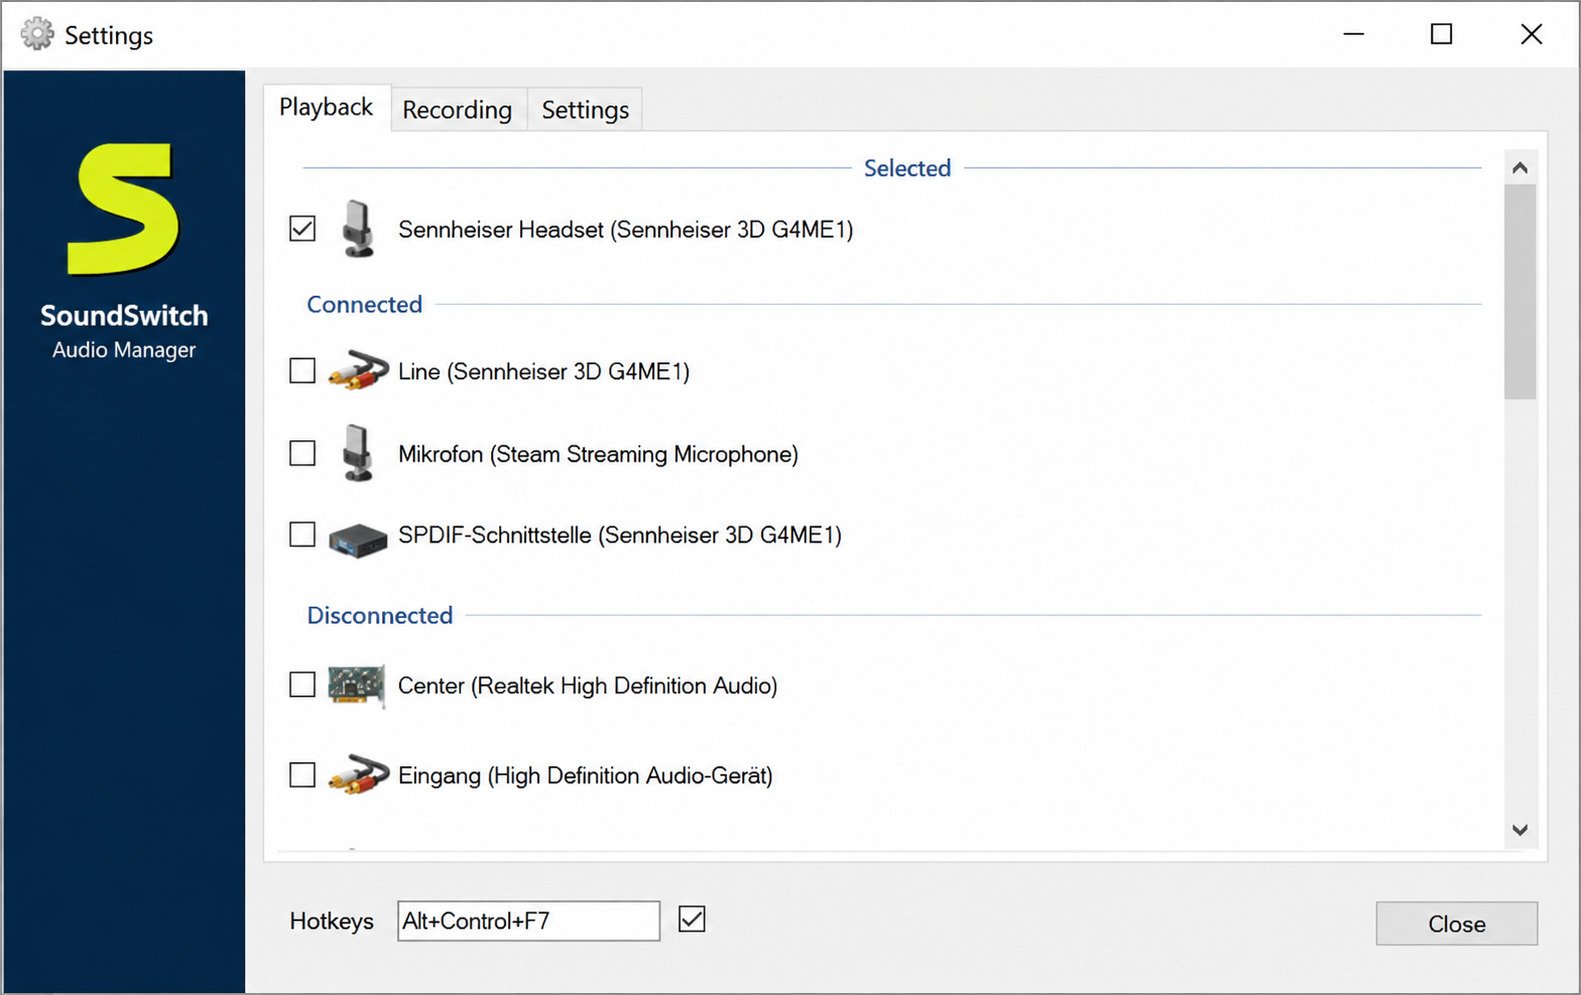
This step matters more than the install itself. Right-click the tray icon, open Settings, and:
- Go to the Playback tab and check the boxes next to the devices you actually want to cycle through
- Go to the Recording tab and do the same for microphones
- Set your hotkeys under the Hotkeys tab
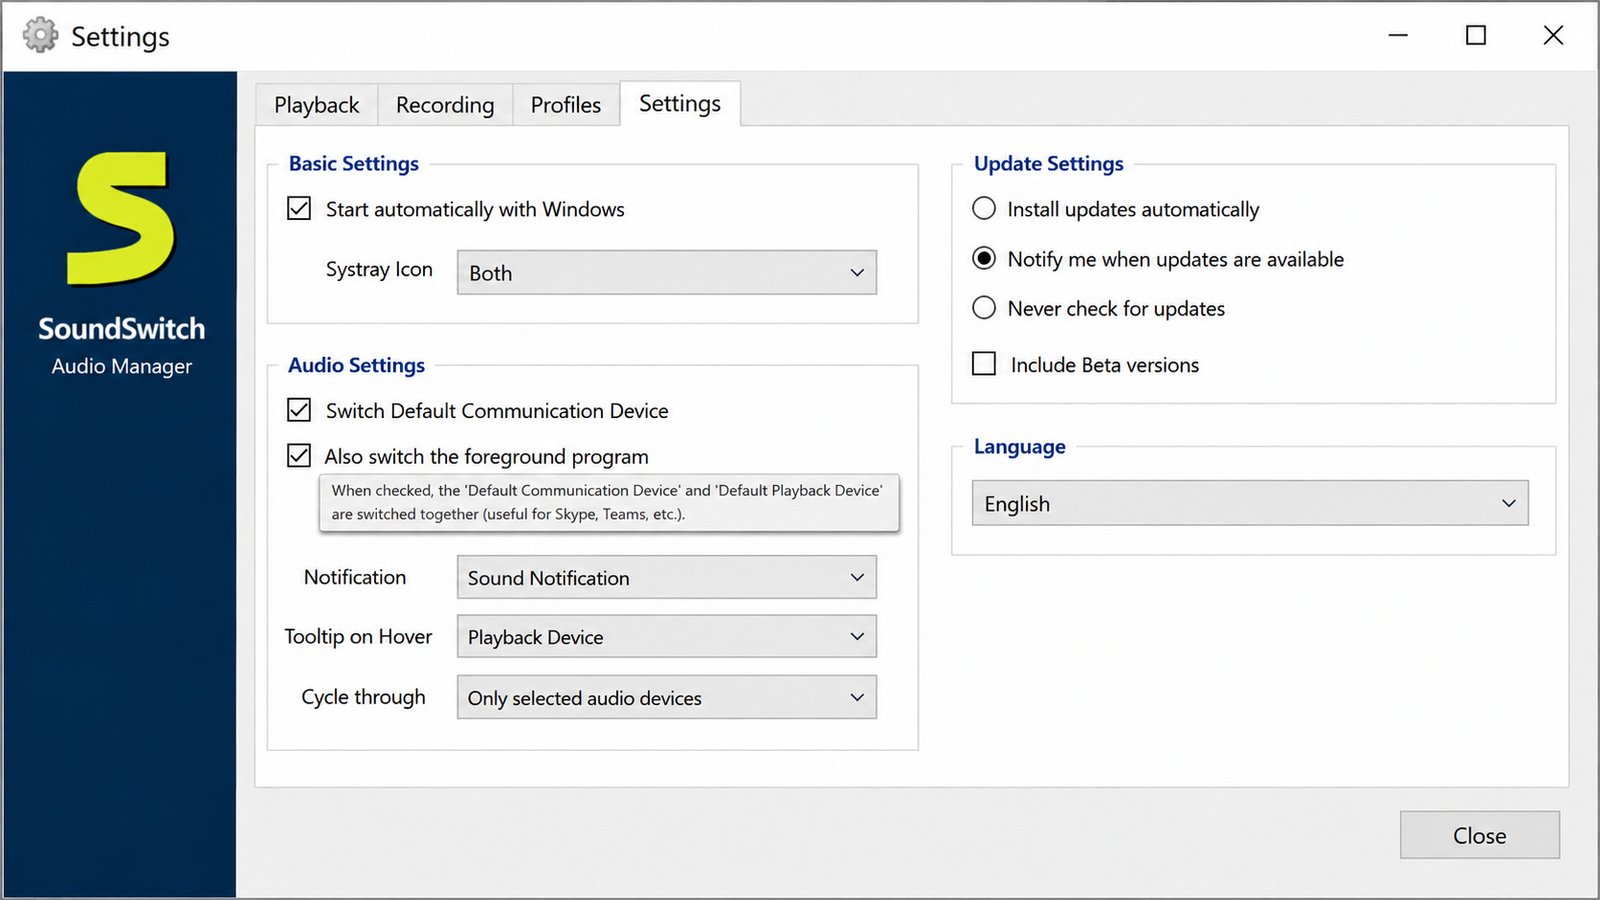
- Optionally enable “Start automatically with Windows” so it’s always running in the background
How to Use SoundSwitch
How to Switch Audio Devices in Windows
Once configured, press your assigned hotkey. SoundSwitch cycles to the next device in your selected list and shows a brief on-screen confirmation.
How to Switch Speakers and Headphones
If speakers and headphones are the only two devices checked in your Playback list, one hotkey press simply toggles between the pair — no need to cycle through unrelated devices like a virtual cable or HDMI output you never use.
How to Change Audio Output in Windows
Right-clicking the tray icon also gives you a direct device list, so you can click a specific device instead of cycling — useful if you have three or more devices configured and want to jump straight to one.
How to Quickly Switch Between Audio Devices
Direct answer: Assign a global hotkey in SoundSwitch’s Settings → Hotkeys tab, then press that combination anytime, in any app, to instantly change your active audio device.
How to Change the Default Audio Device
Switching through SoundSwitch changes the same underlying setting Windows uses for its own “default device,” so any app relying on system audio (not app-specific output settings) follows automatically.
How to Use SoundSwitch Hotkeys
Hotkeys work globally, meaning they function even when SoundSwitch’s window isn’t focused — which is the entire point, since you’ll usually be inside a game, browser, or call app when you need to switch.
How to Set an Audio Device Shortcut in Windows 11
The process is identical to Windows 10: open SoundSwitch Settings, go to the Hotkeys tab, click into the field, and press your desired key combination. Windows 11’s UI differences elsewhere on the system don’t affect this at all.
SoundSwitch Audio Settings and Hotkeys
How to Configure the SoundSwitch Hotkey
Open the tray icon menu → Settings → Hotkeys tab. Click the box next to the action you want to bind (playback switch, recording switch, mic mute) and press your chosen keys.
Switch Audio Output With a Keyboard Shortcut
Most users choose a shortcut involving Ctrl, Alt, or Shift combined with a function key, since those combinations rarely conflict with other software.
Switch Speakers and Headphones With a Hotkey
For this specific use case, a two-device Playback list plus a single toggle hotkey is all you need — there’s no reason to overcomplicate the setup with profiles or per-app rules unless you want them.
Change the Default Sound Device Quickly
Direct answer: the fastest method is a configured hotkey; the second-fastest is right-clicking the SoundSwitch tray icon and picking the device directly from the list.
Customize SoundSwitch Audio Switching
Beyond hotkeys, you can customize:
- Notification type (banner, toast, or sound)
- Whether muted microphones show a persistent on-screen reminder
- Whether the app launches at Windows startup
- Profiles that bundle a full device + volume configuration together
SoundSwitch for Windows 11
SoundSwitch Windows 11 Audio Switcher
Windows 11 changed a lot of visual elements in Settings, but the core audio architecture SoundSwitch relies on is unchanged, so functionality is identical to Windows 10.
Switch Sound Output on Windows 11
Same hotkey-based workflow: press your configured shortcut, and the active output changes instantly.
Switch Speakers and Headphones on Windows 11
No Windows 11-specific steps are needed beyond the standard setup — check your devices, set a hotkey, done.
Change the Default Audio Device on Windows 11
Right-click the tray icon for a direct device list, or use your hotkey for a faster toggle between your regular devices.
Windows 11 Audio Device Shortcut
If you’ve used custom keyboard shortcuts on Windows 11 before (for accessibility features, for example), be aware of potential overlaps — SoundSwitch will simply fail to register a hotkey that’s already claimed elsewhere.
SoundSwitch Troubleshooting
SoundSwitch Not Working
Start with the basics: confirm the app is actually running (check the system tray, including the hidden icons drawer) and that it hasn’t been closed accidentally. A quick restart of the app often resolves temporary glitches.
SoundSwitch Not Switching Audio Devices
If pressing the hotkey does nothing:
- Double check the correct devices are checked under Settings → Playback/Recording
- Confirm the device is actually connected and recognized by Windows itself
- Try switching manually from the tray icon’s device list to isolate whether it’s a hotkey issue or a device-detection issue
SoundSwitch Hotkey Not Working
This is almost always a conflict with another app or a Windows shortcut using the same key combination. Try:
- Reassigning the hotkey to a less common combination
- Closing other background apps that register global hotkeys (some overlay tools, macro software, or game launchers do this)
- Restarting SoundSwitch after changing the hotkey
SoundSwitch Audio Device Not Detected
If a device doesn’t appear in SoundSwitch’s list, it likely isn’t showing up correctly in Windows either. Check Windows Sound Settings first — if it’s missing there too, the issue is a driver or connection problem, not a SoundSwitch bug.
SoundSwitch Not Switching Speakers or Headphones
A common cause: some Bluetooth headphones create two separate audio “devices” in Windows (one for stereo music, one for calls/mic). Make sure you’ve selected the correct one, since ticking the wrong entry can look like a failed switch.
How to Fix SoundSwitch Audio Switching Problems
| Symptom | Likely Cause | Fix |
|---|---|---|
| Hotkey does nothing | Key conflict | Change the hotkey combination |
| Device missing from list | Not detected by Windows | Reconnect device, update drivers |
| Switch works but no sound | Wrong device selected | Verify correct entry in Settings |
| App won’t start | Corrupted install | Reinstall latest version |
| Notification doesn’t appear | Notification setting disabled | Re-enable under Settings → Notifications |
SoundSwitch Alternatives
SoundSwitch isn’t the only option, and depending on what you need, another tool might fit better.
Best SoundSwitch Alternatives for Windows
The most commonly recommended alternatives are EarTrumpet, Audio Switcher, and built-in Windows Sound Settings for anyone who only switches devices occasionally.
SoundSwitch vs EarTrumpet
EarTrumpet takes a broader approach than SoundSwitch. Rather than focusing purely on hotkey-based switching, it replaces the entire Windows volume mixer with a modern tray flyout that shows per-application volume sliders and lets you drag an individual app’s audio to a different output device. It even won a Microsoft Store Community Choice Award in 2022 and is distributed and auto-updated through the Microsoft Store.
| Feature | SoundSwitch | EarTrumpet |
|---|---|---|
| Primary focus | Global hotkey device switching | Per-app volume mixing |
| Per-app volume control | No | Yes |
| Drag-and-drop device routing per app | No | Yes |
| Global hotkeys | Yes, highly customizable | Yes, more limited |
| Distribution | Direct installer / GitHub | Microsoft Store |
| Best for | Streamers, gamers, quick toggling | Power users managing many app volumes |
If you mainly want a fast on/off toggle between two devices, SoundSwitch wins on simplicity. If you regularly juggle volume across many running apps, EarTrumpet’s per-app mixer is the stronger fit.
SoundSwitch vs Audio Switcher
“Audio Switcher” is a similarly named, simpler utility that also lets you toggle your default playback and recording device via hotkey. Functionally the two overlap heavily, though SoundSwitch has a larger community, more frequent updates, and extras like profiles and per-app auto-switching rules.
SoundSwitch vs Windows Sound Settings
For anyone who changes audio devices maybe once a day, native Windows Settings is perfectly adequate and requires zero extra installs. SoundSwitch earns its place when switching becomes frequent enough that a few extra clicks per switch start to genuinely annoy you.
Best Audio Device Switcher for Windows
For pure hotkey-based device switching with minimal overhead, SoundSwitch remains one of the most recommended free tools in this category.
Best Sound Switcher for Windows
If your priority is per-app volume control rather than device switching, EarTrumpet is usually the better recommendation instead.
Free Audio Switcher for Windows
Both SoundSwitch and EarTrumpet are completely free and open source, with no premium upsell for either.
Free Sound Switcher for Windows
Volume2 is another free option worth knowing about, though it leans more toward volume-mixing controls (mouse-wheel volume adjustment, per-window volume) than device switching specifically.
Frequently Asked Questions About SoundSwitch
Yes. SoundSwitch is completely free and open source, with no license fees, subscriptions, or locked features.
Yes. SoundSwitch runs smoothly on Windows 11, with the same setup steps and features available as on Windows 10.
Yes, that’s actually the most common reason people install it — one hotkey toggles instantly between your chosen playback devices.
The fastest built-in method is a SoundSwitch hotkey; without a third-party tool, you’re limited to manually navigating Windows Sound Settings each time.
Yes, hotkeys are fully customizable for playback switching, recording switching, and microphone muting.
EarTrumpet is the most popular alternative, especially if you also want per-application volume control rather than just device switching.
SoundSwitch at a Glance
Key Features and Use Cases
SoundSwitch is best summarized as a hotkey-first audio device switcher: fast, free, open source, and focused on solving one specific annoyance — jumping between speakers, headphones, and microphones without digging through menus.
Supported Windows Versions
Windows 10 and Windows 11 are the primary supported platforms, with compatibility extending back to Windows 7 and 8 for older machines.
Audio Switching and Hotkey Support
Global hotkeys work system-wide, cover both playback and recording devices, and can trigger visual or audio notifications to confirm each switch.
Who Should Use SoundSwitch?
- Gamers who swap between headset and speakers throughout a session
- Streamers who need silent, on-screen confirmation of device changes mid-broadcast
- Remote workers bouncing between calls on a headset and music on speakers
- Anyone with more than one microphone who’s tired of hunting through Windows Settings
If any of that sounds familiar, SoundSwitch is worth the two minutes it takes to install. If you’re also exploring other tools that plug small but persistent gaps in Windows’ default utilities, this breakdown of Blackmagic Desktop Video covers a similarly focused utility, this time for video capture and playback hardware. For deeper technical detail straight from the source, the official SoundSwitch project page documents every setting and release note firsthand.
Conclusion
Switching audio devices shouldn’t feel like a chore, and once you’ve used a tool like SoundSwitch for a week, going back to Windows’ default menus feels genuinely slow. It’s free, it’s open source, and it solves one very specific, very common frustration better than the operating system itself does.
Whether you’re a gamer swapping headsets mid-match or someone just tired of hunting for the right speaker icon, a two-minute setup is all it takes. Give it a try, set your hotkeys once, and you’ll likely forget Windows’ native sound menu even exists.
A small tool that fixes a real, everyday annoyance
SoundSwitch does one job — instant hotkey device switching — and does it better than Windows itself. If you juggle speakers, headsets, and mics more than once a day, it’s an easy, free install. If you need per-app volume control instead, look at EarTrumpet.
2 Responses